Table of Contents
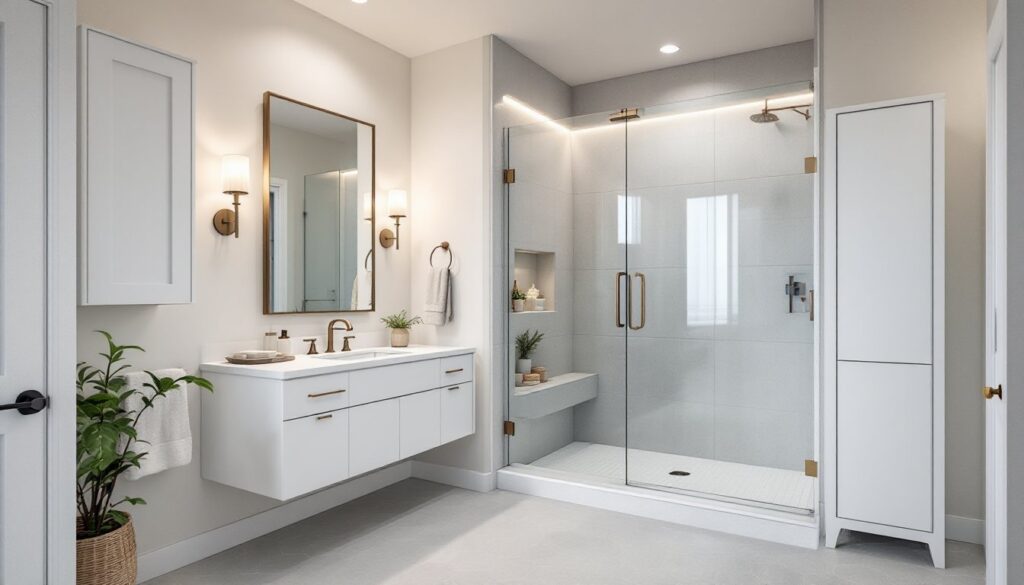
ToggleA small master bathroom doesn’t have to feel cramped or compromise on functionality. With smart design choices, a walk-in shower can become the centerpiece that transforms a tight space into an open, spa-like retreat. The key lies in understanding how layout, materials, and fixtures work together to create visual and functional spaciousness. Whether you’re starting from scratch or renovating an existing bathroom, these practical strategies will help you make every square foot count while achieving that high-end look you’re after.
Key Takeaways
- Small master bathroom ideas thrive when a walk-in shower is positioned in a corner, anchoring the fixture against two walls and freeing up floor space for improved functionality.
- Frameless glass enclosures with open-bottom thresholds and linear drains create seamless sight lines that make the bathroom feel significantly larger than its actual square footage.
- Layer your lighting with recessed fixtures above the shower and wall sconces at the vanity, plus integrated LED strips in the shower niche, to eliminate shadows and add spa-like appeal.
- A 30-inch floating vanity combined with wall-mounted cabinets and vertical storage solutions like linen towers keep the floor visible while maximizing storage without visual clutter.
- Choose large-format tiles (12-by-24 inches or larger) in light, neutral colors with matte finishes to reduce grout lines and reflect light, making the space feel open and airy.
- Install thermostatic mixing valves and wall-mounted fixtures with consistent finishes to prioritize both safety and visual cohesion in your compact walk-in shower layout.
Maximize Space With Smart Walk-In Shower Layouts
Corner Placement Strategies
The most efficient use of a small bathroom is placing your walk-in shower in a corner. This approach anchors the fixture against two walls, freeing up floor space that would otherwise be consumed by an awkward island layout. A corner shower typically requires only two fixed walls, a practical advantage when dealing with limited square footage.
Measure your space carefully before committing. A 3-by-5-foot walk-in shower is a comfortable minimum for movement: anything smaller feels claustrophobic. If you’re working with under 35 square feet of total bathroom space, a 3-by-4-foot niche can work but requires thoughtful fixture placement. Position the showerhead and controls on the wall opposite the entry to maximize usable depth. This small shift makes a real difference in how the space feels when you’re inside.
Corner placement also simplifies plumbing runs. Your drain line and supply lines have a shorter distance to travel, reducing the cost of relocating existing lines, a consideration that often derails small-bath renovations. Most code requires a minimum 5-foot clearance for the toilet, measured from the shower’s edge, so verify your local building code before finalizing dimensions.
Frameless Glass Enclosures
Frameless glass enclosures are non-negotiable for small bathrooms. The metal frame on a framed shower eats visual space and makes the room feel boxed-in. Frameless glass, typically 10mm tempered glass, maintains transparency, allowing sight lines to flow through the bathroom and making it feel significantly larger than it actually is.
Expect to pay 20–40 percent more for frameless versus framed construction, but the payoff in perceived space is worth the investment. A 3-by-5-foot frameless enclosure usually costs $600–$1,200 depending on your region and glass grade. Tempered glass is a safety requirement: it shatters into small, dull cubes rather than dangerous shards if broken.
Choose a frameless glass enclosure with an open-bottom threshold rather than a traditional curb. This step eliminates a visual and physical barrier at ground level, extending the sight line directly from the rest of the bathroom into the shower zone. A linear drain set flush with the floor handles water management while maintaining that seamless appearance. Curbless showers do require slope verification, your floor must pitch toward the drain at roughly 1/8 inch per foot to prevent pooling.
Lighting And Ventilation Solutions For Small Bathrooms
Lighting in a small bathroom does double duty: it banishes shadows that make tight spaces feel tighter, and it highlights finishes and materials that cost good money. Install a moisture-rated recessed light fixture directly above or just in front of the shower, combined with wall sconces flanking the vanity mirror. This layered approach beats a single overhead fixture and creates depth visually.
For walk-in showers without an enclosure frame, an integrated waterproof LED strip light recessed into the niche ceiling adds both function and a subtle spa feel. These cost $80–$150 and install easily during framing, before drywall goes up. If you’re working with an existing bathroom, a surface-mounted waterproof trim-ring fixture is your alternative.
Ventilation can’t be an afterthought in a small bathroom with a walk-in shower. Moisture is the enemy, it leads to mold, degrades finishes, and can damage framing over time. Install a dedicated exhaust fan rated for your bathroom’s square footage (typically 50–100 CFM for a small bath) and duct it to the exterior, never to an attic. Many jurisdictions now require humidity sensors or motion-sensor exhaust fans: check your local building code.
A 6-inch flex duct with a outside vent cap is standard: rigid ductwork is quieter but harder to retrofit. Run the exhaust duct as straight as possible with minimal bends. Size matters: a 4-inch duct running 25+ feet loses efficiency and wastes energy. Your fan should run for at least 30 minutes after showering to expel moisture adequately.
Vanity And Storage Ideas That Don’t Compromise Space
A floating vanity is essential in a small master bathroom. It keeps the floor visible, visually reducing the overall footprint and making cleaning underneath a genuine possibility (unlike a vanity with a base skirt). A 30-inch floating vanity is the sweet spot for a small bath, wide enough for two toothbrush holders, narrow enough not to dominate.
Wall-mounted cabinets directly above the toilet or on an empty wall stretch your storage without eating floor space. A recessed medicine cabinet above the vanity uses the wall cavity itself, so it doesn’t protrude. If you don’t have existing wall space, shallow open shelving (8–10 inches deep) mounted above the toilet keeps towels and toiletries accessible without visual bulk.
Double vanity ideas for small bathrooms often seem impossible, but a cleverly designed narrow vanity with two bowls can work if your bathroom is at least 5 feet wide. This requires custom cabinetry or a modular system like IKEA bathrooms, which offers affordable 48-inch two-bowl vanities that fit standard plumbing rough-ins.
Verical storage is your friend. Tall, narrow linen towers next to the shower take up minimal floor space while holding months’ worth of towels. A corner shelf unit above the toilet adds more storage without blocking access. Keep your vanity drawer organized with custom inserts, a cluttered counter makes a small bathroom feel chaotic regardless of actual dimensions.
Color, Tile, And Finish Choices For Visual Expansion
Light, neutral colors are foundational in a small bathroom. Soft whites, pale grays, and warm beiges reflect light and create airiness. This doesn’t mean your bathroom has to be boring, introduce color through textiles, plants, and accents that you can swap out, rather than locked-in tile and paint.
For the shower surround, consider large-format tiles (12-by-24 inches or larger) over small mosaic tiles. Fewer grout lines mean fewer visual interruptions, making the space feel larger. A continuous slab of porcelain or natural stone across all three shower walls eliminates color transitions that can chop up a small space. Budget $15–$30 per square foot for quality bathroom tile: installation typically runs $10–$15 per square foot depending on complexity.
Floor tile should match or complement the shower tile in color. A 12-inch hexagon or a simple subway pattern works well: avoid intricate patterns that can feel busy in tight quarters. Finish matters too, matte tiles hide water spots and are less slippery than glossy, which is especially important on shower floors and around walk-in areas.
Mirror coverage amplifies light and space. A full-width mirror behind the vanity is standard, but consider mirroring one entire wall opposite a window or light source to bounce natural light around the room. Modern farmhouse master bathrooms often use soft white subway tile with minimal grout, paired with warm wood accents and brass or brushed-nickel fixtures to add warmth without visual clutter.
Fixtures And Hardware That Work For Compact Layouts
Every fixture in a small bathroom should earn its place. Choose a showerhead that delivers adequate spray without being oversized. An 8-inch rainfall showerhead looks luxe, but a 6-inch version performs identically and takes up less visual weight. Wall-mounted fixtures (showerhead, controls, grab bars) keep the shower interior cleaner and less cluttered than exposed plumbing or suction-cup accessories.
Thermostatic mixing valves are smart in any bathroom but essential in a small walk-in shower where you’re close to the showerhead. These maintain water temperature even if someone else draws hot water elsewhere, no sudden scalding surprises. Install one during rough-in: retrofitting is costly.
Grab bars aren’t just for bathrooms for seniors or bathrooms for elderly, they’re safety features anyone benefits from on a wet floor. Stainless steel or powder-coated bars in brushed nickel or matte black blend into contemporary bathrooms. Mount at 33–36 inches high and ensure they’re anchored into studs with a 1.5-inch diameter minimum.
Faucets and hardware should be consistent in finish. Mixing finishes (chrome and brass, for example) fragments visual unity in a confined space. Brushed nickel and matte black are versatile choices that coordinate with most tile. A single-lever faucet at the vanity simplifies the visual line and is easier to operate with wet hands. A delta or moen faucet with a 20-year warranty costs $150–$300 and is a solid long-term investment versus a $40 bargain-bin option that may fail within three years.