Table of Contents
ToggleSmall bedrooms don’t have to feel cramped. A loft bed is one of the smartest moves you can make when square footage is tight, it takes advantage of unused vertical space and opens up the floor for living, working, or storage. Whether you’re furnishing a studio apartment, a teenager’s room, or a guest bedroom that’s more shoebox than sanctuary, a loft bed can transform how the space functions. The key is choosing a design that fits your actual needs: do you want a desk underneath, extra storage, or just breathing room? Let’s walk through seven proven loft bed ideas that work in real homes, not just design magazines.
Key Takeaways
- Small bedroom loft bed ideas maximize vertical space by raising your bed 5–6 feet high, leaving room for a desk, storage, or seating underneath without sacrificing floor area.
- A classic loft bed with desk combo is ideal for home offices and kids’ rooms, requiring only 24–30 inches of desk depth to create a fully functional work-and-sleep setup.
- Built-in storage solutions like cubbies, modular towers, or wall-mounted shelves are essential to a loft bed design, with floating shelves anchored into wall studs providing flexible storage for $30–$800 depending on scope.
- Corner loft placements work well in rooms with sloped ceilings or awkward layouts, creating natural nooks for reading chairs or meditation spaces while providing extra stability through L-shaped support legs.
- DIY loft bed installation requires minimum 8.5–9 feet of ceiling clearance, proper fasteners (lag screws or bolts, never drywall anchors alone), and assembly on the ground before wall placement to ensure safety and stability.
- Industrial steel loft frames offer a contemporary look with superior durability and higher tensile strength than wood, costing $600–$1,500 for pre-fabricated options or $300–$600 in materials for a DIY black steel pipe build.
Classic Loft Bed with Desk Underneath
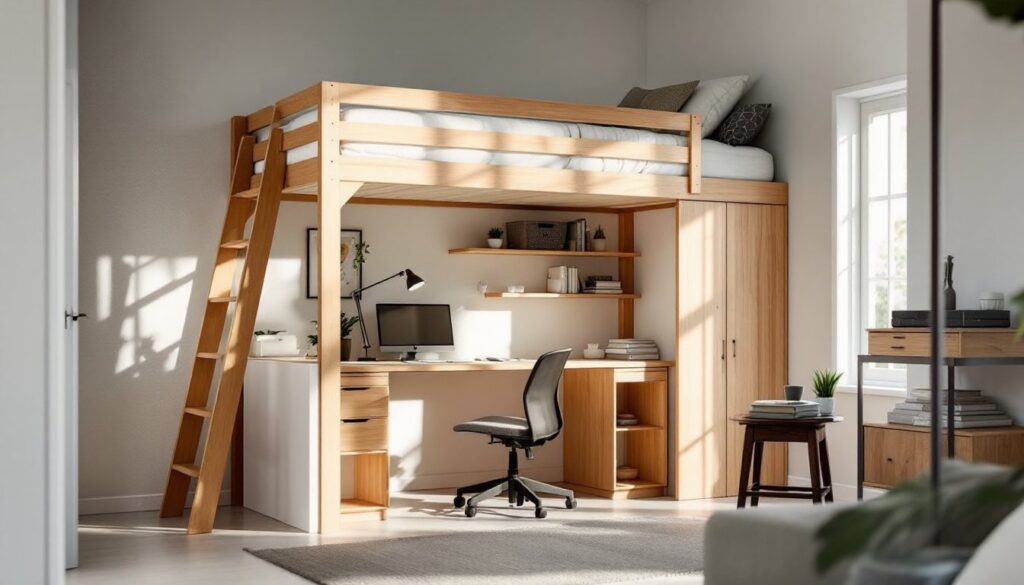
The loft-with-desk combo is the workhorse of small-space living. You sleep above, work or study below, everything stacks vertically without eating into floor area. This setup works especially well in bedrooms that double as home offices or kids’ rooms where assignments happens.
For a standard twin loft, plan on a footprint of roughly 39 inches wide by 75 inches long: full-size lofts run about 54 inches wide. The bed platform itself sits about 5 to 6 feet high, leaving enough headroom under the bed for a desk and chair, typically around 3 to 3.5 feet of clearance.
Material-wise, a sturdy solid wood frame or heavy-duty steel handles the job. If you’re buying ready-made, look for weight capacity of at least 250 to 300 pounds (bed plus sleeper plus movement). If you’re building, use 2×6 or 2×8 pressure-treated lumber for the frame and 3/4-inch plywood for the sleeping platform. Bolts, lag screws, and L-brackets secure everything together: don’t use nails alone.
Installing a desk directly under the loft bed works if you have 24 to 30 inches of desk depth. Some people anchor a basic work surface (like a solid-core door or a reclaimed wood slab) to the wall and loft frame legs. This frees up an extra corner of the room, crucial when every foot matters.
Loft Bed with Built-In Storage Solutions
Storage is the hidden cost of a loft bed, everything that doesn’t fit up top goes down below. Combining your loft frame with integrated storage cabinets, drawers, or cubbies is the answer.
The simplest approach is to build closed cubbies or shelving units into the loft frame legs themselves. Instead of four hollow metal tubes, your support structure includes plywood box frames with 3/4-inch shelves. Each cubby might be 12 to 18 inches tall, stacked two or three high, creating a mini dresser on each side.
Another option: modular storage towers. Companies like IKEA and other retailers sell stackable units that you can position under and around the bed. The advantage is flexibility, if you move, the storage moves with you. Budget roughly $400 to $800 for a decent modular setup, though prices vary widely by material and size.
For a more finished look, consider a built-in wardrobe or clothing rod that runs the length of the loft. Hang rod positioned at about 60 to 65 inches high leaves room for hanging clothes and keeps them off the floor.
Maximizing Vertical Space With Shelving
Don’t waste the wall space around your loft. Install floating shelves or a floor-to-ceiling shelving system on the exposed walls. Wall-mounted shelves are anchored into wall studs using heavy-duty brackets and toggle bolts: follow your stud finder, and you’ll land solid mounting points every 16 inches (standard framing).
Shelf spacing depends on what you’re storing. Books need 8 to 10 inches: decorative items or clothing baskets can be closer at 6 to 8 inches. Keep the top shelves within arm’s reach, usually around 72 inches from the floor at maximum.
A tension rod hung between the loft frame and the wall creates an instant corner closet. Slide storage bins underneath for out-of-season clothing, bedding, or rarely used items. Total cost: $30 to $80. This approach only works if your loft frame is positioned close to a wall, measure before you commit to placement.
Corner Loft Designs for Awkward Layouts
Not every bedroom is a perfect rectangle. Sloped ceilings, odd angles, and architectural quirks make some rooms feel awkward until you use a loft bed to work around them.
Place your loft in a corner under sloped ceilings, and you instantly create usable space where furniture wouldn’t normally fit. Measure the ceiling height at the spot where the sleeping platform will be, you need minimum 3 feet from mattress to ceiling for breathing room and to avoid feeling trapped. If your roof slopes down at 5 feet high on one wall, the loft fits if you angle the bed’s head toward the lower ceiling.
Corner placement also creates a natural nook feel. Under the bed, you gain an alcove for a reading chair, a single-chair lounge, or a small meditation corner, something impossible if the loft were centered in the room. The walls on two sides act as natural sound dampening.
For corner lofts, use L-shaped support legs or corner brackets that bolt into both walls for extra stability. This distributes load and frees up the interior of the room. Clearance under the bed is typically only on one or two sides (the open edges), so plan your desk or seating to face the open area.
Measure the corner angles carefully. If walls aren’t perfectly square (common in older homes), you may need to shim the frame with plastic shims or thin wood wedges to keep everything level. Check with a 4-foot level before final bolting.
Industrial-Style Loft Frames
An industrial loft frame is all about exposed metal pipes and minimalist structure. It looks contemporary, feels sturdy, and can be surprisingly affordable. The style also pairs well with modern bedrooms or shared spaces where aesthetics matter.
Heavy-duty steel tubing (usually 1 to 1.5 inches in diameter) forms the legs and support beams. Connections use welded joints or bolt-and-flange hardware. The sleeping surface is typically metal mesh, plywood, or a slatted frame. The exposed pipes become a design feature, not hidden like in wooden lofts.
Built-in industrial lofts require welding skills and equipment, not beginner territory. But, you can buy pre-fabricated steel loft frames from online retailers and specialty furniture shops. These usually cost $600 to $1,500 depending on size and quality. Assembly is bolt-and-nut work, no welding required.
One major advantage of steel: it won’t sag over time like wood can if the frame isn’t perfectly engineered. Steel has higher tensile strength, meaning thinner material spans farther. A steel loft frame feels solid, and that translates to a sense of security and durability.
For a DIY industrial look with simpler tools, use black steel pipe (available at hardware stores) and flange fittings. Projects like these appear on Ana White’s free furniture plans, where builders share step-by-step instructions. You’ll need a pipe wrench, adjustable wrench, and a drill for assembly. Budget $300 to $600 in materials for a full frame.
DIY Loft Bed Installation Tips
Building or installing a loft bed yourself is doable if you’re methodical about planning and safety. Skipping prep work is where most DIYers run into trouble.
Before you start: Confirm your ceiling height. You need minimum 8.5 to 9 feet of ceiling clearance to install a loft bed safely (sleeping platform at 5 to 6 feet, mattress 10 to 12 inches thick, leaving 2+ feet headroom). If you’re at 8 feet, a loft is tight, consider a different layout.
Check for ceiling joists or roof trusses. If you’re anchoring the loft to the ceiling (common with wall-mounted designs), you’ll need to find and bolt into solid structural members. Use a stud finder that detects wood (not metal), or knock along the ceiling with a hammer, solid joists sound denser. Mark locations with painter’s tape before drilling.
Floor preparation matters. If the floor is carpet, you may want to install shims or hardwood floor plates under loft legs to distribute weight and prevent sinking. A concentrated load from a loft leg on soft carpet can create dips over time.
Assembly order: Build the frame on the ground first. Lay out all pieces, bolt major components together on the flat floor where you can see everything. Then, with help from at least one other person, ideally two, tilt and position the frame in place. Don’t try to assemble the loft while it’s up against the wall or ceiling: you’ll strain yourself and risk dropping tools or pieces.
Use the right fasteners. Lag screws (1/2 inch diameter, 4 to 6 inches long) with washers work for wood-to-wood joints. Bolts with nuts and washers are better for load-bearing connections because you can tighten them down precisely. Never use drywall anchors alone for a loft frame, the entire weight rides on those fasteners.
Once installed, test the bed before committing. Sit on it, move around, push the corners, listen for creaks or movement. Tiny creaks are usually fine (wood settling), but anything that feels loose or sways needs tightening.
Safety gear: Wear safety glasses when drilling or hammering, work gloves when handling metal or rough lumber, and a dust mask if you’re cutting or sanding lumber. If you’re using power tools, ear protection is smart, a circular saw or drill gets loud quickly.
Permits and codes vary. A free-standing loft bed usually doesn’t require a permit, but one anchored to the house structure might. Check with your local building department if you’re wall- or ceiling-mounted. Wall anchoring may also need to follow local building code standards about lateral bracing and load paths. Some jurisdictions have height restrictions or setback requirements for lofted spaces. A quick call costs nothing and saves regret later. IKEA Hackers and Apartment Therapy also feature reader builds where real people document their installation process, sometimes the best learning comes from seeing someone else’s mistakes and solutions.
Conclusion
A loft bed isn’t just furniture, it’s a space-solving strategy. From a classic desk-underneath setup to industrial steel frames, the right loft design turns a cramped bedroom into a functional home. Start by measuring your ceiling, understanding your needs (work, storage, or just breathing room), and being honest about your skills. The best loft bed is one that stays stable, feels secure, and actually gets used. Take your time with the install, ask for help, and don’t skip the safety checks. Your small bedroom will thank you.