Table of Contents
ToggleA small deck doesn’t mean sacrificing safe, stylish stairs to ground level. Whether you’re working with a 4×4 platform or a modest raised patio, the right stair design saves precious square footage while adding visual interest and functionality. This guide walks through seven practical approaches, from floating stairs to spiral designs, that fit tight spaces and work with different budgets and skill levels. You’ll learn how to maximize every inch without cutting corners on safety or durability.
Key Takeaways
- Small deck stairs ideas include floating, spiral, and L-shaped designs that maximize space while maintaining safety and visual appeal for compact outdoor areas.
- Floating stairs and spiral stairs create the illusion of more space, with floating stairs requiring precise engineering and spiral stairs consuming only about 5 feet of diameter.
- L-shaped stairs with built-in storage solutions leverage the void underneath to create weatherproof storage benches, planter beds, or seating platforms without sacrificing deck functionality.
- Composite materials like Trex and TimberTech last 25-30 years without staining or sealing, while pressure-treated wood costs less upfront but requires maintenance every 2-3 years.
- Budget-friendly DIY stair options using modular kits or simple stringers range from $400-$1,200 and can be completed in 2-3 days, provided treads are at least 10 inches deep and risers don’t exceed 7.75 inches for code compliance.
- LED step lighting installed every 12 inches improves safety and visibility on compact stairs while solar-powered options cost $15-$40 per light without hardwiring.
Floating Stairs for a Modern, Minimalist Look
Floating stairs (also called cantilevered stairs) anchor to a side stringer or directly to the deck frame, with no visible supports underneath. They’re visually lightweight and create the illusion of more space below, perfect for small decks where you want to tuck a seating area or storage underneath.
Building floating stairs requires bolting a steel or reinforced wooden support beam to the deck frame, then attaching individual treads (steps) at intervals. Each tread typically spans 10 to 12 inches deep and 36 to 48 inches wide. You’ll need galvanized bolts, lag screws rated for outdoor use, and ideally a structural engineer’s sign-off if your deck is elevated more than 4 feet. Most jurisdictions require permits for stairs that support multiple people.
The trade-off: floating stairs demand precision and proper engineering. Misaligned treads or undersized fasteners are safety hazards. If you’re comfortable with power tools and can read structural plans, a DIY floating stair kit (pre-cut aluminum or composite components) reduces complexity. Otherwise, this is a job for a licensed carpenter or contractor.
Spiral Stairs: Maximizing Style in Tight Spaces
Spiral stairs wrap around a central post in a helical shape, consuming roughly 5 feet of diameter space while accommodating 8 to 12 steps. They work brilliantly for small decks because they use minimal footprint yet look sculptural and intentional.
You can buy prefabricated spiral stair kits (steel, aluminum, or composite) ranging from $800 to $3,000+, or build one from scratch using a center post, curved treads, and balusters. The learning curve is steep, calculating rise, run, and angle requires math that surprises most DIYers. Ready-made kits come with assembly instructions and pre-drilled holes, which saves headaches.
Important: spiral stairs feel steeper than straight stairs because of the angle. Check your local building code: some jurisdictions restrict spiral stairs in certain contexts (like primary egress from living spaces) because they’re harder to navigate quickly in emergencies. They’re ideal for secondary access or climbing to a loft-style deck.
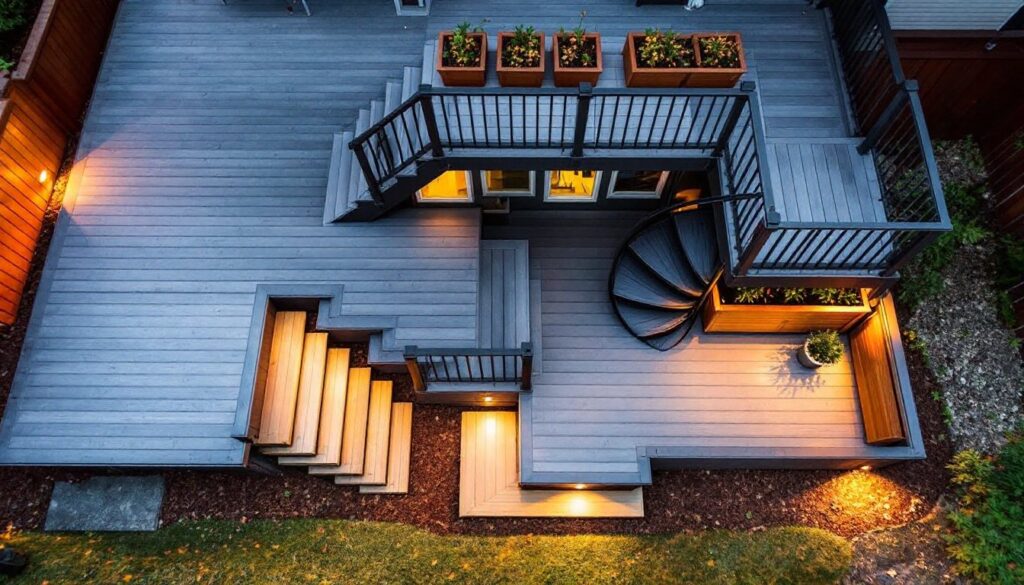
L-Shaped Stairs with Built-In Storage Solutions
An L-shaped (or landing) stair design runs one direction, then turns 90 degrees and continues down. It uses a bit more horizontal space than a straight run, but the landing, roughly 3 feet by 3 feet, becomes a natural storage platform or rest point.
Under-stair voids are prime real estate on compact decks. Homeowners tuck weatherproof storage benches, deck boxes, or even planter beds there, reclaiming space that would otherwise sit empty. To build an L-shaped stair, you’ll frame the landing with 2×10 or 2×12 joists, then attach upper and lower stringer boards (the angled supports holding the treads). Standard tread depth is 10 inches: risers (vertical space between steps) are 7 to 8 inches. Use galvanized or composite hardware throughout.
Leveraging Understairs Space for Seating or Planters
The void beneath L-shaped stairs is often 2 to 3 feet tall and several feet wide. Secure a plywood box or built-in bench to the deck frame using lag screws and carriage bolts. Finish with cedar, composite decking, or exterior paint to match your deck. Add hinges to one side for access to a storage box, or leave it open for visual lightness. Planter boxes tucked under stairs add greenery without competing for deck real estate and they create a welcoming entry point to the outdoor space.
Composite and Wood Materials: Durability Meets Aesthetics
Composite deck stairs (polyurethane-wrapped wood fiber or plastic-wood blends) resist rot, splinters, and staining. Brands like Trex, TimberTech, and AZEK cost 30% to 50% more than pressure-treated wood but last 25 to 30 years versus 15 to 20 for wood. Composite doesn’t require sealing or staining, saving labor over time.
Pressure-treated southern pine or Douglas fir stairs are the budget choice ($2 to $4 per linear foot). They work fine if properly sealed with exterior-grade stain or paint every 2 to 3 years. Cedar or redwood stairs look premium but aren’t inherently more durable, they still need maintenance and cost more upfront.
For small decks, match your stair material to your deck decking for visual cohesion. If your deck is composite, use composite stairs. If it’s wood, stain or paint the stairs the same color. Avoid mixing materials (composite treads on a wood stringer, for example) unless aesthetically intentional, because they expand and contract at different rates, potentially causing squeaks or gaps. Always use stainless-steel or galvanized fasteners, standard steel bolts rust and stain composite material.
Deck Stair Lighting and Safety for Compact Designs
Small stairs need visible edges. Install low-voltage LED step lights (recessed into the riser or mounted flush to the tread edge) every 12 inches along the stair run. Solar-powered options cost $15 to $40 per light: hardwired low-voltage kits run $200 to $500 installed. LED lights last 25,000+ hours and use minimal electricity.
Build stairs to code: treads no less than 10 inches deep, risers no more than 7.75 inches tall, handrails on at least one side if more than 3 steps high, and a graspable railing diameter of 1.25 to 2 inches. Handrails must support 200 pounds of lateral force. In tight spaces, a wall-mounted metal or wood rail occupies less space than a post-and-balusters design. Paint or stain the top of each tread a contrasting color to improve visibility.
Wear safety glasses when cutting or fastening stairs. Use a dust mask if grinding composite material. Check fasteners monthly for looseness: a wobbly stair is a lawsuit waiting to happen.
Budget-Friendly DIY Stair Options for Small Decks
Simple straight stairs using 2×12 stringers and 2×10 treads cost $400 to $800 in materials for a 4-step run. Cut the stringers using a circular saw and a stair calculation guide (online calculators or reference tables help). Pre-drill and bolt everything: screws alone won’t hold stair loads safely.
Consider a staircase with a built-in landing. The landing reduces the total number of steps needed, which lowers material cost and makes climbing easier for kids or elderly users. Beginner woodworking projects often cover simple stair builds: many DIYers start there before tackling custom designs.
For ultra-tight budgets, modular stair kits (pre-cut stringers, treads, and hardware bundled) run $500 to $1,200. You assemble and bolt them to your deck. Quality varies: read reviews carefully and check whether hardware is included and galvanized. Easy stairs tutorials provide step-by-step guidance for basic builds. Plan 2 to 3 days for a novice DIYer: experienced builders finish in a day. A helper makes layout and fastening much safer and faster.